Statue Drag: Difference between revisions
(→Door jukes: smaller image) |
(completed the page) |
||
| Line 5: | Line 5: | ||
== Statue Drag to Helmasaur == | == Statue Drag to Helmasaur == | ||
You can reach and defeat Helmasaur in [[No Logic]] with nothing but bombs, a weapon for fighting Helmasaur, and optionally a mirror. | You can reach and defeat Helmasaur in [[No Logic]] with nothing but bombs, a weapon for fighting Helmasaur, enough health to survive two bombs and a spike, and optionally a mirror. | ||
This guide will describe the setup with the mirror. The longer setup without the mirror appears at the end of [https://imgur.com/gallery/PC8c476 malmo's Statue Drag to Helmasaur guide]. | This guide will describe the setup with the mirror. The longer setup without the mirror appears at the end of [https://imgur.com/gallery/PC8c476 malmo's Statue Drag to Helmasaur guide]. | ||
| Line 37: | Line 37: | ||
</gallery> | </gallery> | ||
The second statue drag has a timing and positioning requirement that is tricky to achieve because you won't be able to see your sprite. You want to drop a bomb facing left, wait a short amount of time, tap down, and statue drag upward (for about 3 seconds) until the bomb explodes. The "short amount of time" is often measured as "two sword slashes", though I | The second statue drag has a timing and positioning requirement that is tricky to achieve because you won't be able to see your sprite. You want to drop a bomb facing left, wait a short amount of time, tap down, and statue drag upward (for about 3 seconds) until the bomb explodes. The "short amount of time" is often measured as "two sword slashes", though I found that while learning I tended to momentarily hesitate enough that one sword slash was the correct timing instead. | ||
During the drag upward, your Y coordinate should pass <tt>$900</tt> and reach a value from <tt>$8FD</tt> to <tt>$8FF</tt>. The bomb knockback should snap you back to <tt>$900</tt>. This jukes the transition. Once again, release A during the explosion. | During the drag upward, your Y coordinate should pass <tt>$900</tt> and reach a value from <tt>$8FD</tt> to <tt>$8FF</tt>. The bomb knockback should snap you back to <tt>$900</tt>. This jukes the transition. Once again, release A during the explosion. | ||
[[Image:statue-drag-7.png|thumb|none| | [[Image:statue-drag-7.png|thumb|none|384px|This part really isn't visible in screenshots. Here's the explosion at the end]] | ||
Walk down through the room (remember not to dash). You should see the screen scroll to a screen-wrapped version of the room, where the lobby door no longer leads outside. If the screen doesn't scroll like this, you didn't juke the transition correctly and you'll need to start over. | Walk down through the room (remember not to dash). You should see the screen scroll to a screen-wrapped version of the room, where the lobby door no longer leads outside. If the screen doesn't scroll like this, you didn't juke the transition correctly and you'll need to start over. | ||
| Line 52: | Line 52: | ||
</gallery> | </gallery> | ||
You are now done with the statue dragging part, and you're in a screen-wrapped version of the PoD lobby that you can manipulate to enter Helmasaur's room. | You are now done with the statue dragging part, and you can dash after this. You're in a screen-wrapped version of the PoD lobby that you can manipulate to enter Helmasaur's room. | ||
=== Getting to Helmasaur === | === Getting to the Helmasaur tile === | ||
(in | Walk down and right through the gap where the statue used to be, then up and right to between the two pots. Lift the right pot to hit the floor switch, and walk back to the left. | ||
You can choose to lift the left pot also (it contains a bomb, which you might need), but it can be helpful to leave it there to line up against. | |||
Walk up and down repeatedly to scroll the screen, until the bottom edge of the screen is in the middle of the second brick up from the floor. Don't accidentally enter the stairs. Then walk or dash directly down. You'll wrap around the screen, come through the shutter door, and it will shut behind you. From this point, do not press up until you get to Helmasaur's tile. | |||
The objects you are near at this point are the same pots, though you can't see them. Hug the right side of the left pot again. Walk right to step on the switch again, then left back to where you were, on the right side of the left pot. Walk or dash down until the screen transition. | |||
<gallery widths=256px heights=224px> | |||
statue-drag-10.png|Walk to the pot on the right, lift it up, and hit the switch. | |||
statue-drag-11.png|Walk back to the pot on the left. | |||
statue-drag-12.png|Walk up and down to scroll the screen. | |||
statue-drag-14.png|Scroll the screen to this point, and walk or run down. | |||
statue-drag-15.png|When you come through the shutter door, it shuts behind you. Find the spot on the right side of the left pot again, with no upward movements. | |||
statue-drag-16.png|Walk right (apparently into the wall) and step on the floor switch to reopen the door. | |||
statue-drag-17.png|Walk left to the edge of the pot again. | |||
statue-drag-18.png|Go down to transition to the Helmasaur tile. | |||
</gallery> | |||
=== Unwrapping the boss fight === | |||
When you enter the Helmasaur tile, nothing will be visible and you'll be in the top wall, among the spikes. | |||
Hold left as you enter the tile. You'll take damage from a spike. As the damage is knocking you back, hold up-left to escape from the spike area. | |||
Now you can move up and down until the camera gets to the correct part of the tile, and fight Helmasaur. | |||
<gallery widths=256px heights=224px> | |||
statue-drag-19.png|Hold left until you take damage, then up-left. | |||
statue-drag-20.png|Dodge the spooky partially-visible Helmasaur. | |||
statue-drag-21.png|As you move vertically, you'll scroll the normal view of the fight onto the screen. | |||
</gallery> | |||
If the screen transitions back up instead of getting you into the Helmasaur fight, either you scrolled the screen incorrectly in the previous step, or you pressed up+left too soon. | |||
Revision as of 14:17, 20 May 2021
Statue Drag is a major glitch where the game thinks you're pulling on a statue as you go through a door. It is the only way to Door Juke (cross over a door's transition line without transitioning through it) in a north-facing door.
This glitch is only allowed under the No Logic ruleset.
Statue Drag to Helmasaur
You can reach and defeat Helmasaur in No Logic with nothing but bombs, a weapon for fighting Helmasaur, enough health to survive two bombs and a spike, and optionally a mirror.
This guide will describe the setup with the mirror. The longer setup without the mirror appears at the end of malmo's Statue Drag to Helmasaur guide.
Setup
Open the key door in the Palace of Darkness (NL) lobby, then mirror while pushing on the right statue.
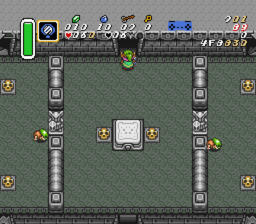
This is not the door where you will perform Statue Drag, but it needs to be open.
Mirror while pushing this statue, which arms the ability to statue drag.


Door jukes
When Statue Drag is armed, you can hold A to drag a non-existent statue -- once. Usually, your ability to drag will go away when you release A. However, if you release A while being knocked back from damage, the Statue Drag state will be preserved.
In this step, you will use statue drag three times:
- To bomb snap into the door without going through it
- To door juke the subtile transition to the north, then walk over it to the south
- To door juke the door to the south, which will no longer lead outside
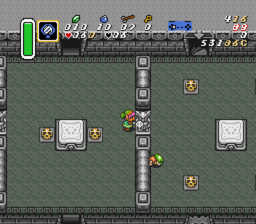
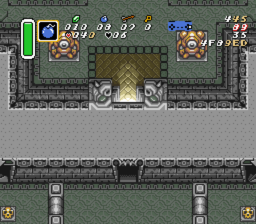
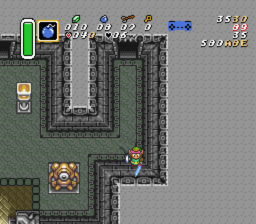
Line up with the door in the middle of the tile by sliding sideways against the wall with your sword out, and drop a bomb in the door. Before the bomb explodes, walk a little bit into the door, face south, and hold A to drag to the north. Stop moving when just the tips of Link's knuckles are visible (one pixel of Link's hands, or just the outline). Stay in this position and release A while the bomb explodes. This should leave you at Y coordinate $910. Tap left, and confirm that you're on the correct coordinate -- you should see just the bottom pixel of Link's shadow in the door.
Line up with the door and place a bomb.
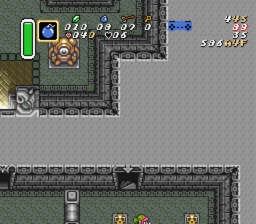
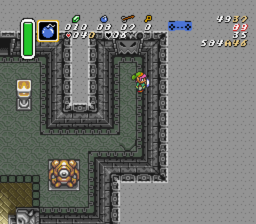
Drag upward into the door. In this image, we're in the middle of the drag -- stop when the tips of Link's knuckles are visible.

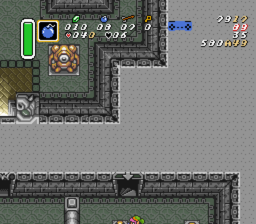
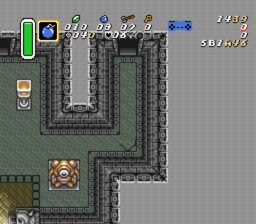
Release all buttons as the bomb explodes.

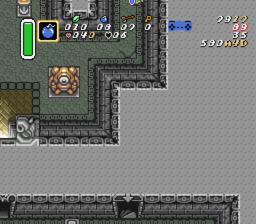
Tap left and confirm that you're on the correct coordinate.


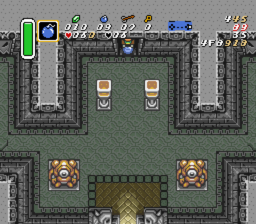
The second statue drag has a timing and positioning requirement that is tricky to achieve because you won't be able to see your sprite. You want to drop a bomb facing left, wait a short amount of time, tap down, and statue drag upward (for about 3 seconds) until the bomb explodes. The "short amount of time" is often measured as "two sword slashes", though I found that while learning I tended to momentarily hesitate enough that one sword slash was the correct timing instead.
During the drag upward, your Y coordinate should pass $900 and reach a value from $8FD to $8FF. The bomb knockback should snap you back to $900. This jukes the transition. Once again, release A during the explosion.

Walk down through the room (remember not to dash). You should see the screen scroll to a screen-wrapped version of the room, where the lobby door no longer leads outside. If the screen doesn't scroll like this, you didn't juke the transition correctly and you'll need to start over.
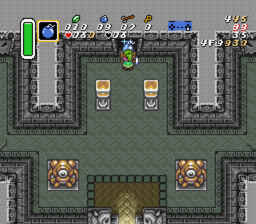
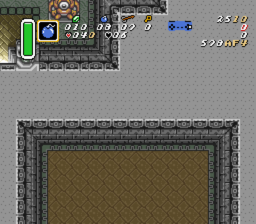
Statue drag downward though this door until pots are fully visible in the lower left and lower right corners, then release and walk normally the rest of the way through the door.

Walk down through the room and note the weird vertical scrolling.
Drag this far through the door, then release A and walk through it.


You are now done with the statue dragging part, and you can dash after this. You're in a screen-wrapped version of the PoD lobby that you can manipulate to enter Helmasaur's room.
Getting to the Helmasaur tile
Walk down and right through the gap where the statue used to be, then up and right to between the two pots. Lift the right pot to hit the floor switch, and walk back to the left.
You can choose to lift the left pot also (it contains a bomb, which you might need), but it can be helpful to leave it there to line up against.
Walk up and down repeatedly to scroll the screen, until the bottom edge of the screen is in the middle of the second brick up from the floor. Don't accidentally enter the stairs. Then walk or dash directly down. You'll wrap around the screen, come through the shutter door, and it will shut behind you. From this point, do not press up until you get to Helmasaur's tile.
The objects you are near at this point are the same pots, though you can't see them. Hug the right side of the left pot again. Walk right to step on the switch again, then left back to where you were, on the right side of the left pot. Walk or dash down until the screen transition.
Walk to the pot on the right, lift it up, and hit the switch.
Walk back to the pot on the left.
Walk up and down to scroll the screen.
Scroll the screen to this point, and walk or run down.
When you come through the shutter door, it shuts behind you. Find the spot on the right side of the left pot again, with no upward movements.
Walk right (apparently into the wall) and step on the floor switch to reopen the door.

Walk left to the edge of the pot again.
Go down to transition to the Helmasaur tile.


Unwrapping the boss fight
When you enter the Helmasaur tile, nothing will be visible and you'll be in the top wall, among the spikes.
Hold left as you enter the tile. You'll take damage from a spike. As the damage is knocking you back, hold up-left to escape from the spike area.
Now you can move up and down until the camera gets to the correct part of the tile, and fight Helmasaur.
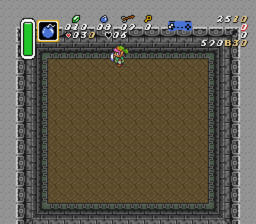
Hold left until you take damage, then up-left.
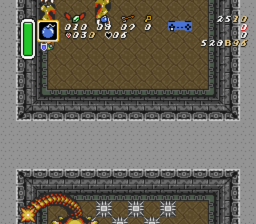
Dodge the spooky partially-visible Helmasaur.
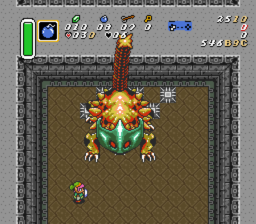
As you move vertically, you'll scroll the normal view of the fight onto the screen.


If the screen transitions back up instead of getting you into the Helmasaur fight, either you scrolled the screen incorrectly in the previous step, or you pressed up+left too soon.