Herapot: Difference between revisions
No edit summary |
|||
| Line 3: | Line 3: | ||
}} | }} | ||
Herapot is a special version type of a [[Rail Clipping|Rail Clip]] that allows the player to access the secret Fairy Room in the Tower of Hera by using a | [[Herapot]] is a special version type of a [[Rail Clipping|Rail Clip]] that allows the player to access the secret [[Fairy Room]] in the [[Tower of Hera]] by using a [[Bomb Boost]] and the [[Hookshot]] to pass though the half-tile side of the pot on the first floor and falling though the hole. This allows the player to access top of [[Hera]] without needing the [[Big Key]]. | ||
__TOC__ | __TOC__ | ||
==Execution== | ==Execution== | ||
Entering the Herapot is done in two steps: | Entering the [[Herapot]] is done in two steps: | ||
#Clip one pixel into the left side of the pot by utilizing a | # Clip one pixel into the left side of the pot by utilizing a [[Bomb Boost]] or [[superspeed]]. | ||
#Use the | # Use the [[Hookshot]] to grapple the inside of the pot then fall into the hole. | ||
===Step One: Clipping into the Herapot=== | ===Step One: Clipping into the [[Herapot]]=== | ||
The general setup for the clip into the pot places a bomb at a specific location and adjusts the player to another specific location to get the correct damage boost trajectory into the pot and then needs to have Link face right to use the Hookshot in the next step. While the player positioning needs to be precise to get the correct bomb boost there are actually many valid pairs of coordinates for bomb-placement and Link-position to clip into the pot. These coordinate pairs can be different however depending on which direction Link is facing. | The general setup for the clip into the pot places a bomb at a specific location and adjusts the player to another specific location to get the correct damage boost trajectory into the pot and then needs to have Link face right to use the [[Hookshot]] in the next step. While the player positioning needs to be precise to get the correct bomb boost there are actually many valid pairs of coordinates for bomb-placement and Link-position to clip into the pot. These coordinate pairs can be different however depending on which direction Link is facing. | ||
====Boots Setup==== | ====[[Boots]] Setup==== | ||
If the player has | If the player has [[Boots]] they can use a [[Dash-Turn]] to change Link's direction after the damage boost. This allows the player to place a bomb facing left and then only have to adjust Link's y-position while still facing the same direction before the bomb goes off (typically by [[Sword Charge|Sword Charging]]). | ||
These are some examples of valid coordinate pairs using | These are some examples of valid coordinate pairs using [[Boots]] setup. | ||
{| class="wikitable" | {| class="wikitable" | ||
| Line 34: | Line 34: | ||
====Bootsless Setup==== | ====Bootsless Setup==== | ||
Bootsless setups are very similar to that of Boots setups except that Link must be facing right before the damage boost. This makes positioning slightly more complicated after the bomb is placed since both Link's X and Y coordinates have to be adjusted during the bomb's fuse timer. However it is recommended learning a Bootsless setup first due to the fact it will always be an option. | Bootsless setups are very similar to that of [[Boots]] setups except that Link must be facing right before the damage boost. This makes positioning slightly more complicated after the bomb is placed since both Link's X and Y coordinates have to be adjusted during the bomb's fuse timer. However it is recommended learning a Bootsless setup first due to the fact it will always be an option. | ||
These are some examples of valid coordinate pairs using | These are some examples of valid coordinate pairs using Bootsless setup. | ||
{| class="wikitable" | {| class="wikitable" | ||
| Line 52: | Line 52: | ||
|} | |} | ||
{{Warning|Important Note about Bomb Setups: There is an situation where the game can cause strange behavior with how bombs can knock-back the player. If an enemy in Sprite Slot 0 dies and leaves an item behind, and Link collects this item while it is still floating in the air, then it can set an altitude value that will affect the bomb knock back. The [[Mini-Moldorm]] enemy in the {{Dungeon Room|Tower of Hera|Hera Lobby}} is such an enemy in Sprite Slot 0 and caution should be taken to not pick up any item it drops.}} | |||
{{Warning|To fix a broken bomb trajectory simply exit and re-enter the dungeon or use the stairs to change to a new supertile.}} | |||
====[[Spinspeed]] Setup==== | |||
This method utilizes the ability to slightly clip into the pot using [[superspeed]] gained from the {{Dungeon Location|Tower of Hera|Map Chest|Map Chest}} pedestal instead of a [[Bomb Boost]]. This is done activating [[superspeed]] and then lining up with the upper wall with the downstairs door. From here there are several methods to get into the pot. One example is to tap right to get to an X-coordinate of '''E7C''' then then hold {{B|v>}} diagonal for about 8 frames to get into position. This method can be difficult to pull off since it is very easy to overshoot the position into the pot from the fast movement speed. | |||
Once the player has the proper position from Step One, use the Hookshot to grapple onto the inside of the pot. Once inside press {{B|<}} once then then hold {{B|^}} to fall into the hole. If any other directions are held while trying to fall in the hole there is a significant risk of setting stuck inside the pot and causing a softlock requiring the player to Save & Quit (using the Mirror will not work) | ===Step Two: [[Hookshot]] Into the Pot=== | ||
Once the player has the proper position from Step One, use the [[Hookshot]] to grapple onto the inside of the pot. Once inside press {{B|<}} once then then hold {{B|^}} to fall into the hole. If any other directions are held while trying to fall in the hole there is a significant risk of setting stuck inside the pot and causing a [[softlock]] requiring the player to [[Save & Quit]] (using the Mirror will not work) | |||
==Uses== | ==Uses== | ||
There are other pots in the game that can be entered though similar methods in Eastern Palace and Ice Palace to access those Fairy rooms but generally the one in Tower of Hera is the most useful. | There are other pots in the game that can be entered though similar methods in [[Eastern Palace]] and [[Ice Palace]] to access those [[Fairy]] rooms but generally the one in Tower of Hera is the most useful. | ||
{{Warning|However there is one important exception: If a pot in the {{Dungeon Room|Hyrule Castle Tower|Tower Lobby|Hyrule Castle Tower Lobby}} is entered it will lead directly to the [[Ganon]] fight. This pot is refered to as [[Ganonpot]] and its use is NOT ALLOWED in Competitive mode races.}} | |||
==Examples== | ==Examples== | ||
Revision as of 21:00, 13 September 2020
| Herapot | |
|---|---|
| Classification | Minor Glitch |
Herapot is a special version type of a Rail Clip that allows the player to access the secret Fairy Room in the Tower of Hera by using a Bomb Boost and the Hookshot to pass though the half-tile side of the pot on the first floor and falling though the hole. This allows the player to access top of Hera without needing the Big Key.
Execution
Entering the Herapot is done in two steps:
- Clip one pixel into the left side of the pot by utilizing a Bomb Boost or superspeed.
- Use the Hookshot to grapple the inside of the pot then fall into the hole.
Step One: Clipping into the Herapot
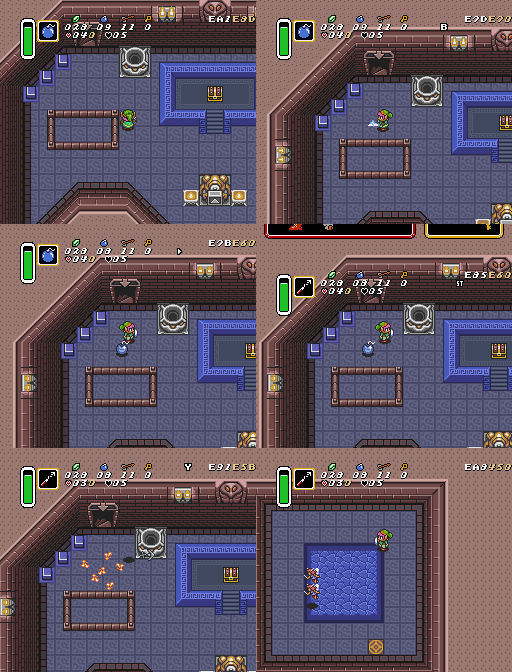
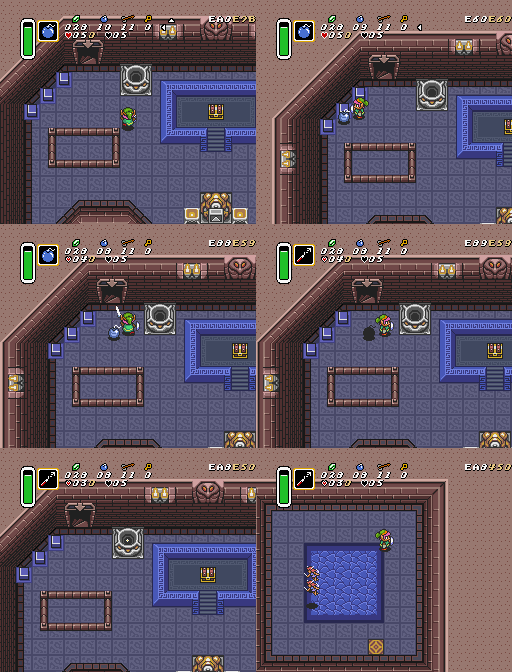
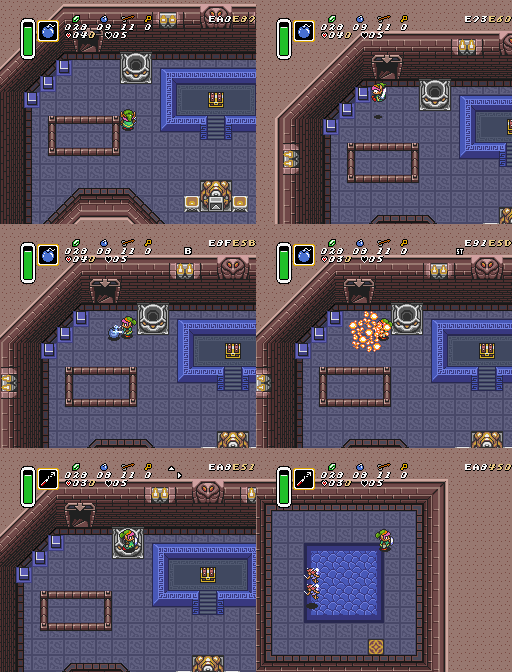
The general setup for the clip into the pot places a bomb at a specific location and adjusts the player to another specific location to get the correct damage boost trajectory into the pot and then needs to have Link face right to use the Hookshot in the next step. While the player positioning needs to be precise to get the correct bomb boost there are actually many valid pairs of coordinates for bomb-placement and Link-position to clip into the pot. These coordinate pairs can be different however depending on which direction Link is facing.
Boots Setup
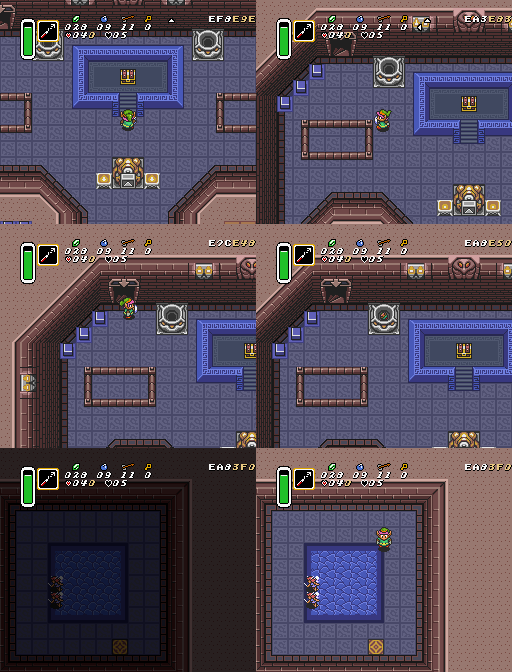
If the player has Boots they can use a Dash-Turn to change Link's direction after the damage boost. This allows the player to place a bomb facing left and then only have to adjust Link's y-position while still facing the same direction before the bomb goes off (typically by Sword Charging).
These are some examples of valid coordinate pairs using Boots setup.
| Bomb Position | Damage Position |
|---|---|
| E8F , E61 | E8F , E5A |
| E8F , E62 | E8F , E5B |
| E8F , E60 | E8F , E59 |
Note: coordinates are in hexadecimal and taken with assistance of the Practice Hack. For use during actual runs a visual cue should be determined for positioning.
Bootsless Setup
Bootsless setups are very similar to that of Boots setups except that Link must be facing right before the damage boost. This makes positioning slightly more complicated after the bomb is placed since both Link's X and Y coordinates have to be adjusted during the bomb's fuse timer. However it is recommended learning a Bootsless setup first due to the fact it will always be an option.
These are some examples of valid coordinate pairs using Bootsless setup.
| Bomb Position | Damage Position |
|---|---|
| E8F , E61 | E8D , E5A |
| E8F , E62 | E8D , E5B |
| E8F , E60 | E8D , E59 |
| E88 , E60 | E89 , E59 |
| E83 , E70 | E86 , E60 |
Spinspeed Setup
This method utilizes the ability to slightly clip into the pot using superspeed gained from the Map Chest pedestal instead of a Bomb Boost. This is done activating superspeed and then lining up with the upper wall with the downstairs door. From here there are several methods to get into the pot. One example is to tap right to get to an X-coordinate of E7C then then hold diagonal for about 8 frames to get into position. This method can be difficult to pull off since it is very easy to overshoot the position into the pot from the fast movement speed.
Step Two: Hookshot Into the Pot
Once the player has the proper position from Step One, use the Hookshot to grapple onto the inside of the pot. Once inside press once then then hold to fall into the hole. If any other directions are held while trying to fall in the hole there is a significant risk of setting stuck inside the pot and causing a softlock requiring the player to Save & Quit (using the Mirror will not work)
Uses
There are other pots in the game that can be entered though similar methods in Eastern Palace and Ice Palace to access those Fairy rooms but generally the one in Tower of Hera is the most useful.
Examples
| Bootsless Method (Dracarys) | Bootsless Method (Double Bomb) |
|---|---|
 |

|
| Boots Method | Superspeed Method |
|---|---|
 |

|