Diver Down: Difference between revisions
Trinexx!9552 (talk | contribs) (update) |
Trinexx!9552 (talk | contribs) (added rayden's video in guides section) |
||
| (17 intermediate revisions by 3 users not shown) | |||
| Line 1: | Line 1: | ||
{{ALttP Glitch | {{ALttP Glitch | ||
|classification = | |classification = Minor | ||
}} | }} | ||
Diver Down is a type of | [[Diver Down]] is a type of [[Rail Clipping]] that allows access to ledges over water in [[Swamp Palace]]. It can be used in pool #2 and pool #3 to save time accessing item chests on the left side, and to save time getting to the {{Dungeon Location|Swamp Palace|Boss}}. | ||
__TOC__ | |||
==Execution== | ==Execution== | ||
===[[Somaria]] + Movement=== | |||
This method using the [[Somaria Block]] and some precise movement works on the left side rail in Pool 3 and is the fastest method if done quickly. | |||
# Align with the bottom of the rail and place a block approximately at the end of the left-side rail. | |||
# Move up into the corner and then push the block until the player is aligned in the corner of the stairs and the end of the rail. | |||
# Press {{B|v}} for one frame. | |||
# Press {{B|<^}} on the same frame and continue holding that direction. | |||
# Transition to holding {{B|<}}, then hold out your sword. | |||
# Transition back to holding {{B|<^}} to clip into the rail and jump off the ledge. | |||
''Note: The {{B|v}} movement can be buffered using a menu to [[Hookshot]] and then {{B|<^}} can be held leaving the menu '' | |||
{| class="wikitable" | |||
! Diver Down - [[Somaria]] and Movement | |||
|- | |||
! [[File:Diver Down - Swamp Pool 3 - Somaria Left.gif]] | |||
|} | |||
=== | ===[[Somaria]] + Splash Jump=== | ||
====Right Side Rail==== | |||
There are several ways to perform [[Diver Down]] using a splash jump on both the left and right rails. | |||
# Align with the bottom of the rail to place a [[Somaria Block]] approximately under the end of the right side rail. | |||
# Hold {{B|^}} to jump into the water. | |||
# While you're in the jump animation start holding {{B|v>}}. (You need to hold {{B|V>}} before the frame after the splash appears). | |||
# Transition to holding {{B|>}} before you jump out of the water. You have 23 frames to press {{B|>}} after the splash appears. | |||
# Continue holding {{B|>}} after jumping back out of water to get into position. Link's coordinates should be '''D70,FAF''' in Pool 3 and '''AF8,7AF''' in Pool 2 for the the clip to work. | |||
# Hold out sword and hold {{B|^>}} to clip into the rail and then hold {{B|^}} once fully inside the rail to jump off. | |||
{| class="wikitable" | |||
! Diver Down - Block Splash Jump - Pool 3 || Diver Down - Block Splash Jump - Pool 2 | |||
|- | |||
! [[File:Diver Down - Swamp Pool 3 - Somaria Right.gif]] || [[File:Diver Down - Pool 2 Key Flood.gif]] | |||
|} | |||
=== | ====Left Side Rail==== | ||
This can also be done easily on the left side rail at the expense of being a little bit slower. | |||
# Align with the bottom of the rail to place a [[Somaria Block]] approximately under the end of the left side rail. | |||
# Hold {{B|^}} to jump into the water. | |||
# Hold {{B|<}} while jumping until you splash into the water and then transition to holding {{B|v}} until Link touches the bottom wall. | |||
# Hold {{B|V>}} to slowly move along the bottom wall until Link jumps out of the water. | |||
# Tap {{B|<}} after jumping back out of water to get into position. Link's coordinates should be '''D60,FAF''' for the the clip to work. | |||
# Hold out sword and hold {{B|^<}} to clip into the rail and then hold {{B|^}} once fully inside the rail to jump off. | |||
{| class="wikitable" | |||
! Diver Down - Somaria and Splash Left | |||
|- | |||
! [[File:Diver Down - Swamp Pool 3 - Somaria Left Splash.gif]] | |||
|} | |||
===Bomb + Splash Jump=== | |||
# Align with the bottom of the rail and walk sideways so that Link has space to move up towards the stairs and then tap {{B|^}} for one frame to move 2 pixels. (Y-coordinate should be '''7B6''' in Pool2 and '''FB6''' in Pool3) | |||
# Be at least 3 pixels to the left of the rail and tap {{B|<}} to face left to place a bomb. (Full coordinate ranges below). | |||
# Hold {{B|^}} to jump into the water. | |||
# Holding {{B|v>}} while jumping until you splash into the water. (You Need to have {{B|v>}} set before the frame after the splash appears). | |||
# Transition to holding {{B|>}} before you jump out of the water. You have 23 frames to press {{B|>}} after the splash appears. | |||
# Continue holding {{B|>}} after jumping back out of water to get into position. Link's coordinates should be '''D70,FAF''' in Pool 3 and '''AF8,7AF''' in Pool 2 for the the clip to work. | |||
# Get hit by the bomb and then tap {{B|<}} or {{B|>}} after Link stops moving from knockback. (You can also continue holding RIGHT in the previous step). | |||
# Hold {{B|^}} to jump off the ledge and hold {{B|<}} to get out of the wall. | |||
====Valid Bomb Coordinates==== | |||
*Pool 3 Bomb X-Coordinates (Right Rail): '''D66 - D6D''' | |||
*Pool 2 Bomb X-Coordinates = '''AE8 - AF6''', (Note: X = AF0 is a bad coordinate) | |||
{| class="wikitable" | {| class="wikitable" | ||
! Diver Down - Swamp | ! Diver Down - Swamp Pool 2 - Bomb || Diver Down - Swamp Pool 3 - Bomb | ||
|- | |- | ||
! [[File:Diver Down - | ! [[File:Diver Down - Pool 2 Key Flood Bomb.gif]] || [[File:Diver Down - Swamp Pool 3 - Bomb.gif]] | ||
|} | |} | ||
===Delayed [[Crystal Switch]]=== | |||
[[Diver Down]] in Pool 2 can be done in conjunction with a delayed crystal switch hit to gain quicker access the Left Side Swamp chests. This method can only be done before completing the back of the dungeon. You need to have the key from the main hub. | |||
# Use the [[Small Key]] to enter the Pool 2 switch room and then push the lever to flood the room. | |||
# Place a bomb next to the [[Crystal Switch]] and then move down into the doorway but do not leave the room. | |||
# Wait for the bomb to explode and then transition to the next room before the crystal switch activates. | |||
# Do any of the Pool 2 [[Diver Down]] setups and then move up into the room with the flooded key. | |||
# The crystal switch should now activate saving some time having to backtrack. | |||
''NOTE: Do not place the bomb before flooding the room or else you may risk causing a very large amount of lag during the cut-scene'' | |||
{| class="wikitable" | {| class="wikitable" | ||
! Diver Down | ! Diver Down with Delayed Crystal Switch | ||
|- | |- | ||
! [[File: | ! [[File:Pool2 diverdown with delayed switch-bomb.gif]] | ||
|} | |} | ||
==External Guides and Tutorials== | |||
*[https://www.youtube.com/watch?v=6xqvSGD3GXs Andy's Quick Tutorial on Diver Down (Holy Diver) and Ice Breaker glitches in ALTTP!] | |||
*[https://www.youtube.com/watch?v=NaRkoU21k1A Coy's How To: Diver Down] | |||
*[https://www.youtube.com/watch?v=kS4V0Xy8ddc AceZer0's ALTTP Easy Diver Down Tutorial - 3 Different Setups] | |||
*[https://www.youtube.com/watch?v=DmEkkE43iK0 LordRayden's Diver Down - Movement Method] | |||
Latest revision as of 11:41, 5 August 2023
| Diver Down | |
|---|---|
| Classification | Minor Glitch |
Diver Down is a type of Rail Clipping that allows access to ledges over water in Swamp Palace. It can be used in pool #2 and pool #3 to save time accessing item chests on the left side, and to save time getting to the Boss.
Execution
Somaria + Movement
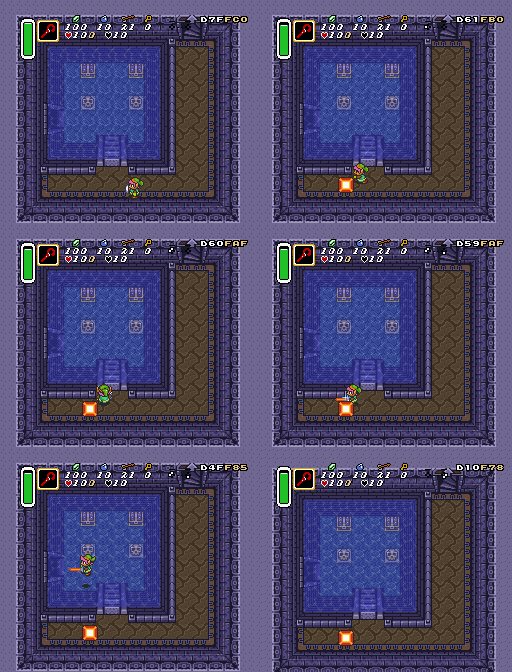
This method using the Somaria Block and some precise movement works on the left side rail in Pool 3 and is the fastest method if done quickly.
- Align with the bottom of the rail and place a block approximately at the end of the left-side rail.
- Move up into the corner and then push the block until the player is aligned in the corner of the stairs and the end of the rail.
- Press for one frame.
- Press on the same frame and continue holding that direction.
- Transition to holding , then hold out your sword.
- Transition back to holding to clip into the rail and jump off the ledge.
Note: The movement can be buffered using a menu to Hookshot and then can be held leaving the menu
| Diver Down - Somaria and Movement |
|---|
|
Somaria + Splash Jump
Right Side Rail
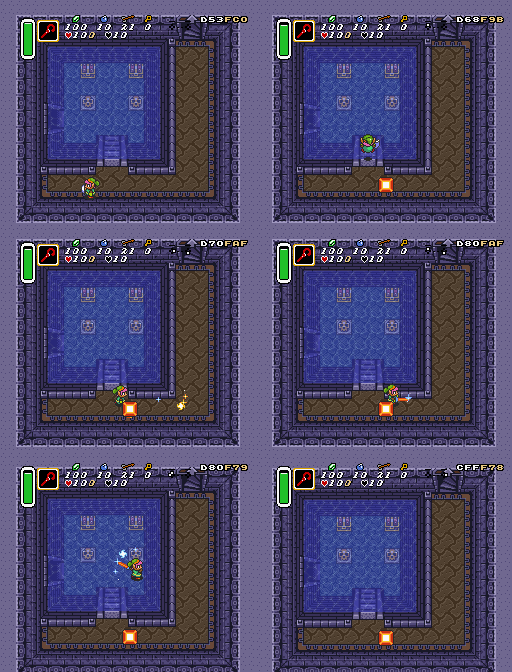
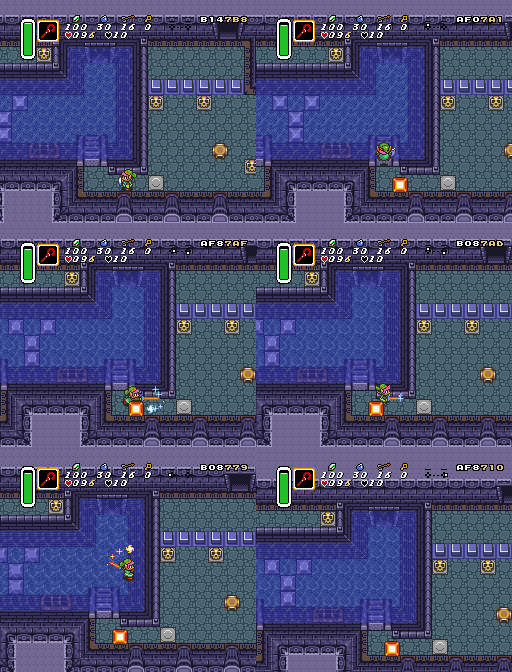
There are several ways to perform Diver Down using a splash jump on both the left and right rails.
- Align with the bottom of the rail to place a Somaria Block approximately under the end of the right side rail.
- Hold to jump into the water.
- While you're in the jump animation start holding . (You need to hold before the frame after the splash appears).
- Transition to holding before you jump out of the water. You have 23 frames to press after the splash appears.
- Continue holding after jumping back out of water to get into position. Link's coordinates should be D70,FAF in Pool 3 and AF8,7AF in Pool 2 for the the clip to work.
- Hold out sword and hold to clip into the rail and then hold once fully inside the rail to jump off.
| Diver Down - Block Splash Jump - Pool 3 | Diver Down - Block Splash Jump - Pool 2 |
|---|---|
 |
|
Left Side Rail
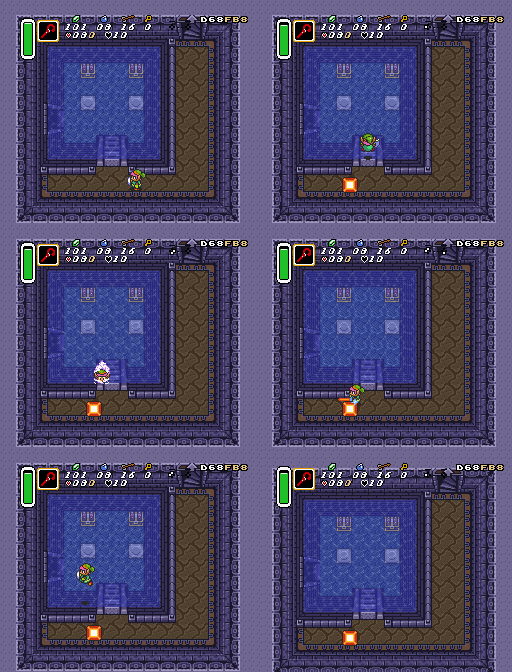
This can also be done easily on the left side rail at the expense of being a little bit slower.
- Align with the bottom of the rail to place a Somaria Block approximately under the end of the left side rail.
- Hold to jump into the water.
- Hold while jumping until you splash into the water and then transition to holding until Link touches the bottom wall.
- Hold to slowly move along the bottom wall until Link jumps out of the water.
- Tap after jumping back out of water to get into position. Link's coordinates should be D60,FAF for the the clip to work.
- Hold out sword and hold to clip into the rail and then hold once fully inside the rail to jump off.
| Diver Down - Somaria and Splash Left |
|---|
|
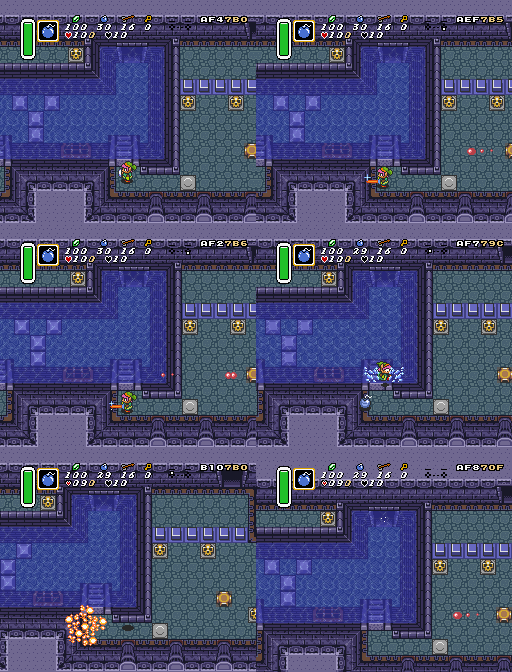
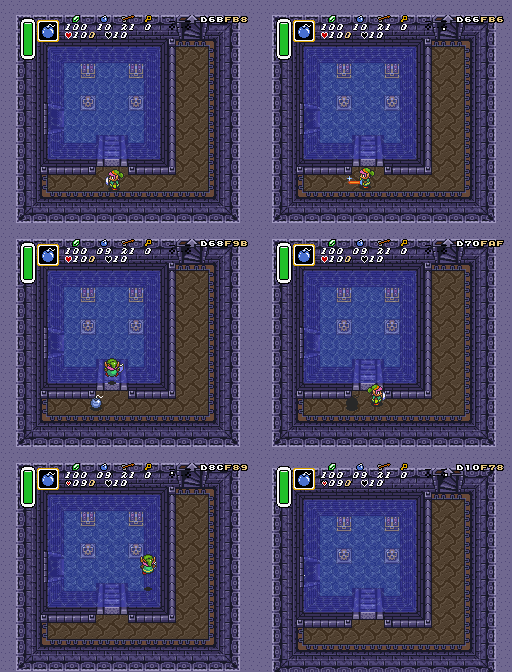
Bomb + Splash Jump
- Align with the bottom of the rail and walk sideways so that Link has space to move up towards the stairs and then tap for one frame to move 2 pixels. (Y-coordinate should be 7B6 in Pool2 and FB6 in Pool3)
- Be at least 3 pixels to the left of the rail and tap to face left to place a bomb. (Full coordinate ranges below).
- Hold to jump into the water.
- Holding while jumping until you splash into the water. (You Need to have set before the frame after the splash appears).
- Transition to holding before you jump out of the water. You have 23 frames to press after the splash appears.
- Continue holding after jumping back out of water to get into position. Link's coordinates should be D70,FAF in Pool 3 and AF8,7AF in Pool 2 for the the clip to work.
- Get hit by the bomb and then tap or after Link stops moving from knockback. (You can also continue holding RIGHT in the previous step).
- Hold to jump off the ledge and hold to get out of the wall.
Valid Bomb Coordinates
- Pool 3 Bomb X-Coordinates (Right Rail): D66 - D6D
- Pool 2 Bomb X-Coordinates = AE8 - AF6, (Note: X = AF0 is a bad coordinate)
| Diver Down - Swamp Pool 2 - Bomb | Diver Down - Swamp Pool 3 - Bomb |
|---|---|
 |
|
Delayed Crystal Switch
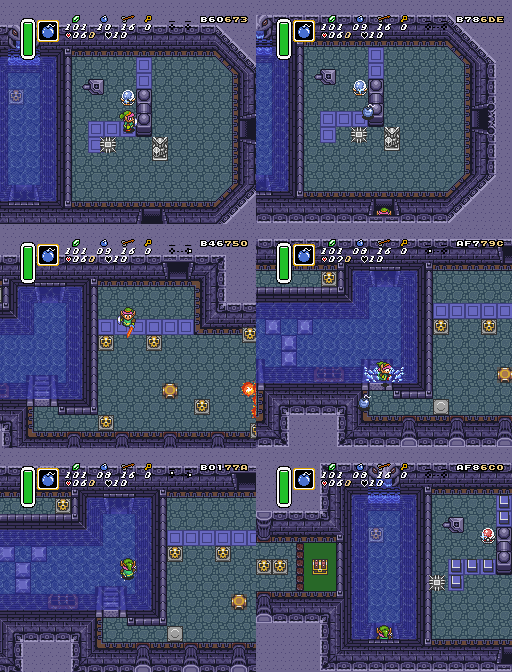
Diver Down in Pool 2 can be done in conjunction with a delayed crystal switch hit to gain quicker access the Left Side Swamp chests. This method can only be done before completing the back of the dungeon. You need to have the key from the main hub.
- Use the Small Key to enter the Pool 2 switch room and then push the lever to flood the room.
- Place a bomb next to the Crystal Switch and then move down into the doorway but do not leave the room.
- Wait for the bomb to explode and then transition to the next room before the crystal switch activates.
- Do any of the Pool 2 Diver Down setups and then move up into the room with the flooded key.
- The crystal switch should now activate saving some time having to backtrack.
NOTE: Do not place the bomb before flooding the room or else you may risk causing a very large amount of lag during the cut-scene
| Diver Down with Delayed Crystal Switch |
|---|
|