Diver Down: Difference between revisions
Trinexx!9552 (talk | contribs) (some instruction editing) |
Trinexx!9552 (talk | contribs) m (formatting) |
||
| Line 11: | Line 11: | ||
===Bomb + Splash Jump=== | ===Bomb + Splash Jump=== | ||
Place a bomb facing left in a specific position (see range below) and then jump in water holding DOWN+RIGHT then hold RIGHT after splashing to jump back out of water into position. Link's | Place a bomb facing left in a specific position (see range below) and then jump in water holding DOWN+RIGHT then hold RIGHT after splashing to jump back out of water into position. Link's coordinates should be '''D70,FAF''' for the the clip to work. After bomb explodes hold up to jump off the ledge | ||
*Pool 3 Bomb Coordinates (Right Rail): D66-D6D , FB6 | *Pool 3 Bomb Coordinates (Right Rail): '''D66-D6D , FB6''' | ||
*Pool 2 Bomb Coordinates = AF2,7B6 | *Pool 2 Bomb Coordinates = '''AF2,7B6''' | ||
This can also be done on a left-side rail. Place a bomb facing RIGHT in a specific position (see range below) and then jump into the water holding down and then transitioning into holding LEFT to hop out. Link's | This can also be done on a left-side rail. Place a bomb facing RIGHT in a specific position (see range below) and then jump into the water holding down and then transitioning into holding LEFT to hop out. Link's coordinates should be '''D60,FAE''' for the the clip to work. Continue holding LEFT after jumping out of the water and then hold UP to jump off the ledge. Note: The movement during the splash positioning is a little bit trickier due to the swimming timing being more difficult than the right side and may require a bit of practice. | ||
*Pool 3 Bomb Coordinates (Left Rail) : D60-D6A , FB5 | *Pool 3 Bomb Coordinates (Left Rail) : '''D60-D6A , FB5''' | ||
===Somaria + Splash Jump=== | ===Somaria + Splash Jump=== | ||
Align with the bottom of the rail to place a Somaria block approximately under the end of the rail. Jump into the in water holding DOWN+RIGHT then hold RIGHT after splashing to jump back out of water into position. Link's | Align with the bottom of the rail to place a Somaria block approximately under the end of the rail. Jump into the in water holding DOWN+RIGHT then hold RIGHT after splashing to jump back out of water into position. Link's coordinates should be '''D70,FAF''' for the the clip to work. Hold out sword and hold UP+RIGHT to clip into the rail and then jump UP once fully in. | ||
===Somaria + Movement=== | ===Somaria + Movement=== | ||
Revision as of 18:17, 14 March 2020
| Diver Down | |
|---|---|
| Classification | Minor Glitch |
Diver Down
Diver Down is a type of rail clipping that allows access to restricted ledges.
Execution
THIS SECTION STILL BEING WORKED ON FOR CLARITY
Bomb + Splash Jump
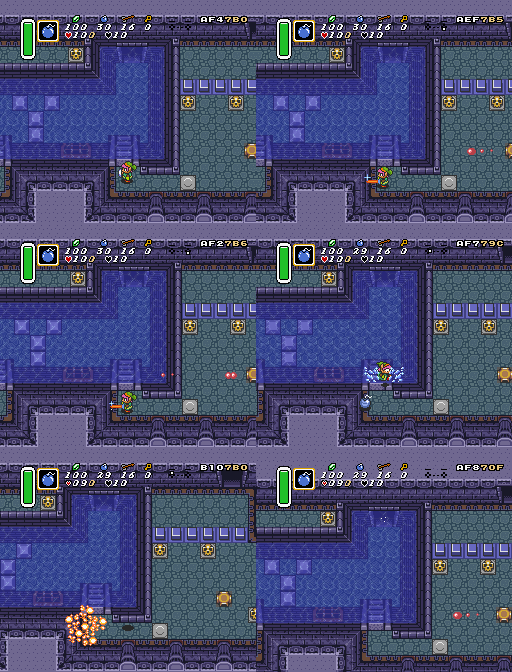
Place a bomb facing left in a specific position (see range below) and then jump in water holding DOWN+RIGHT then hold RIGHT after splashing to jump back out of water into position. Link's coordinates should be D70,FAF for the the clip to work. After bomb explodes hold up to jump off the ledge
- Pool 3 Bomb Coordinates (Right Rail): D66-D6D , FB6
- Pool 2 Bomb Coordinates = AF2,7B6
This can also be done on a left-side rail. Place a bomb facing RIGHT in a specific position (see range below) and then jump into the water holding down and then transitioning into holding LEFT to hop out. Link's coordinates should be D60,FAE for the the clip to work. Continue holding LEFT after jumping out of the water and then hold UP to jump off the ledge. Note: The movement during the splash positioning is a little bit trickier due to the swimming timing being more difficult than the right side and may require a bit of practice.
- Pool 3 Bomb Coordinates (Left Rail) : D60-D6A , FB5
Somaria + Splash Jump
Align with the bottom of the rail to place a Somaria block approximately under the end of the rail. Jump into the in water holding DOWN+RIGHT then hold RIGHT after splashing to jump back out of water into position. Link's coordinates should be D70,FAF for the the clip to work. Hold out sword and hold UP+RIGHT to clip into the rail and then jump UP once fully in.
Somaria + Movement
Align with the bottom of the rail and place a block approximately at the end of the left-side rail. Move up into the corner and then push the block until the player is aligned in the corner of the stairs and the end of the rail. Move one frame DOWN and then buffer movement UP-LEFT to get into position. Be facing LEFT to charge sword and then hold UP+LEFT to clip into the rail.
Uses
Diver Down is typically used in the back of Swamp Palace to avoid having to drain Pool #3 to and access the some item chests and Boss quicker. It can also be used to recover a flooded key in Pool 2.
Example
| Diver Down - Swamp Pool3 - Bomb | Diver Down - Swamp Pool3 - Block (R) | Diver Down - Swamp Pool3 - Block (L) |
|---|---|---|
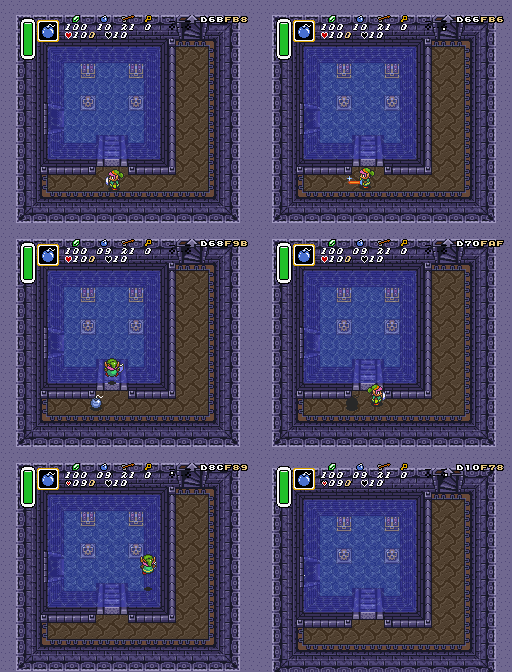 |
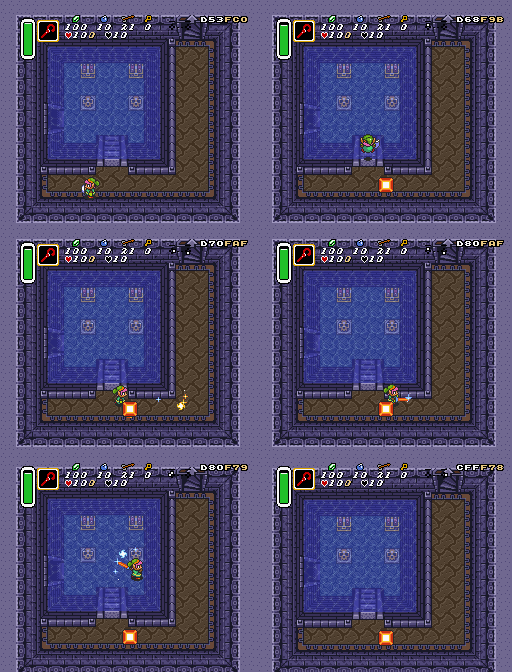 |
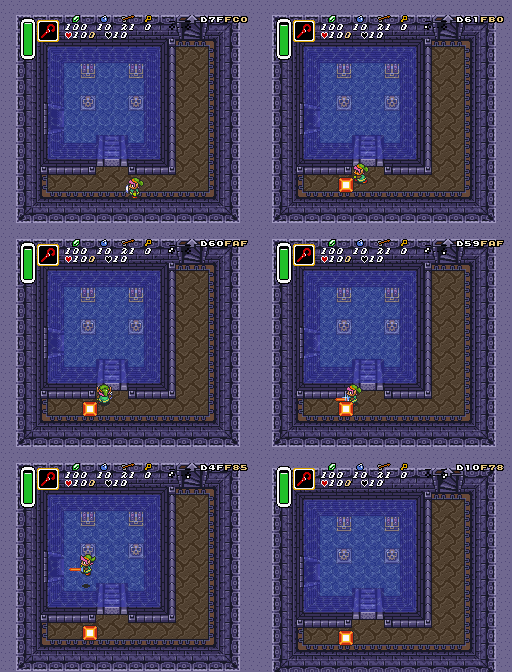
|
| Diver Down - Swamp Pool 2 - Block | Diver Down - Swamp Pool 2 - Bomb |
|---|---|
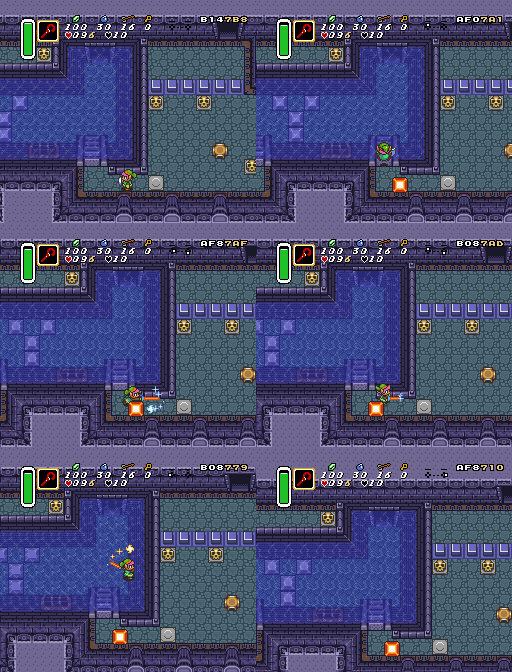 |
|